The Dimensions Input Panel
The Dimensions Input Panel tool allows you to: -Distance [D]: Place a control point an exact distance from the last. -Angle [A]: Place a control point at an absolute angle, or at a chosen angle compared to the last two points. -Offset [O]: Offset something (//fix this) . -Point [P]: Place an object or control point at a chosen location on your plan relative to the plan's centerpoint. -Coordinates [C]: Or place an object or control point at a given coordinate (latitude/longitude).
Each of these can be engaged by clicking the corresponding key on your keyboard while you are drawing or placing an object.
Once a suitable key is clicked while drawing or placing an object, a small window will appear in the top-left of your canvas. Here you will be able to input the value related to your desired result. You may also switch between Dimensions Input Panel tools as needed.
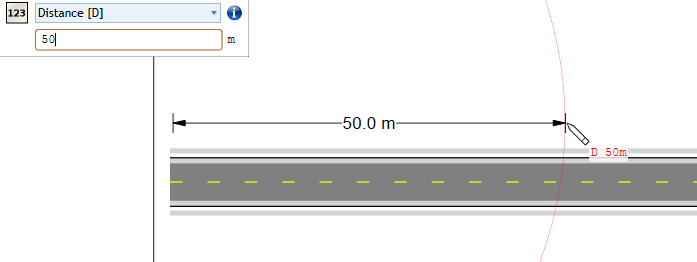
Distance [D]
Once you have placed at least one control point for an object you can click 'D' on your keyboard, enter a value in the textbox and click Enter.
A red circle will appear around the last point, locking in the chosen distance for your next control point placement.
If you need this tool again for your next point, simply click 'D' again and repeat.
If you decide against using the distance tool once the red circle has already been engaged, click Esc to cancel.
Note: If the point you are currently drawing a line from is snapped to a geometric object or line, the distance plugged into to the Distance tool will automatically measure along the object or line selected if desired.
Angle [A]
By clicking 'A' on your keyboard when drawing a line or object you will be able to dictate the exact angle in degrees between your next and last control point.
By default if at least two control points have been placed, the Angle tool will give you the next angle based on an the direction of travel between the last two points. For example, if I have two points with my last point being to the right of the one prior - if '0' was put into the Angle tool and Enter was pressed, the Angle tool would continue in exactly the same direction to the right. Alternatively if '90' was inserted it would turn at right angles to the direction of travel's right (downward), and if '-90' was inserted it would turn at right angles to the existing direction of travel's left.
Alternatively, if we engage 'Absolute' angles by clicking the checkbox on the Dimension Input Panel, the angle you give it will assume 0 being towards the top of the screen, regardless of the location of prior control points.
Note: If you have only place one control point, your input will automatically be taken as an Absolute value, as there is no direction of travel to compare the input to.
Offset [O]
Click 'O' to open the Offset tool in the Dimension Input Panel will allow you to select the location of your next point based on how far you want it to travel on X and Y axis from your last control point.
Positive X values will travel to the right, and positive Y values will place your next control point lower on the plan. The format for inputting them is 'X,Y'. For example, inputting '15,10' will place your next control point 15 metres (or your chosen distance of measurement) to the right, and 10 metres down from your last control point. If you need the next point to travel to the left, use a negative X value, or a negative Y value to travel upward, eg. '-10,-10'.
Point [P]
Point allows you to select a point on your plan for a control point by inputting a pixel value relative to the center point of your plan.
The centerpoint of your plan is dictate by the red cross, set by the location chosen during setup. As you move your mouse across the canvas, notice the red pixel values change in the bottom right corner of the plan. Inputting these values into the Point setting of the Dimension Input Panel will place your control point in that location.
Like Offset, a positive X value will be to the right of the plan's center point, and a positive Y value will be below the center point. For example, the input '-150,100' will place a control point to the left of and below the red cross in the center of the plan.
Note: Unlike the prior three tools, Point and Coordinates to follow do not require a prior control point, and can be used as soon as your mouse appears as a pencil (ready to draw an object).
Coordinates [C]
The Coordinates setting in the Dimension Input Panel allow you to select the location of your next control point based on that location's latitude and longitude values.
For example, '35.1561, -90.0519'.
Note: Latitude and longitude of a given point on the canvas in RapidPlan can be copied to your clipboard by right clicking at the point > 'Copy Coordinates'.