Swept Path Analysis Properties
A Swept Path's properties can be updated in order to:
- Convey information about direction of travel, speed, wheel tracking.
- To allow for a margin of error.
- To distinguish one path from another on your plan.
- To create a unique, trademark style for your company.
Details on the different properties of a swept path can be found below, organised by the headings of each sub-section.
Vehicle section
Below the object name heading, the first editable section of a swept path's properties is Vehicle.
Here you will see details and a preview image of the appearance of the vehicle as it will appear on plan if desired.
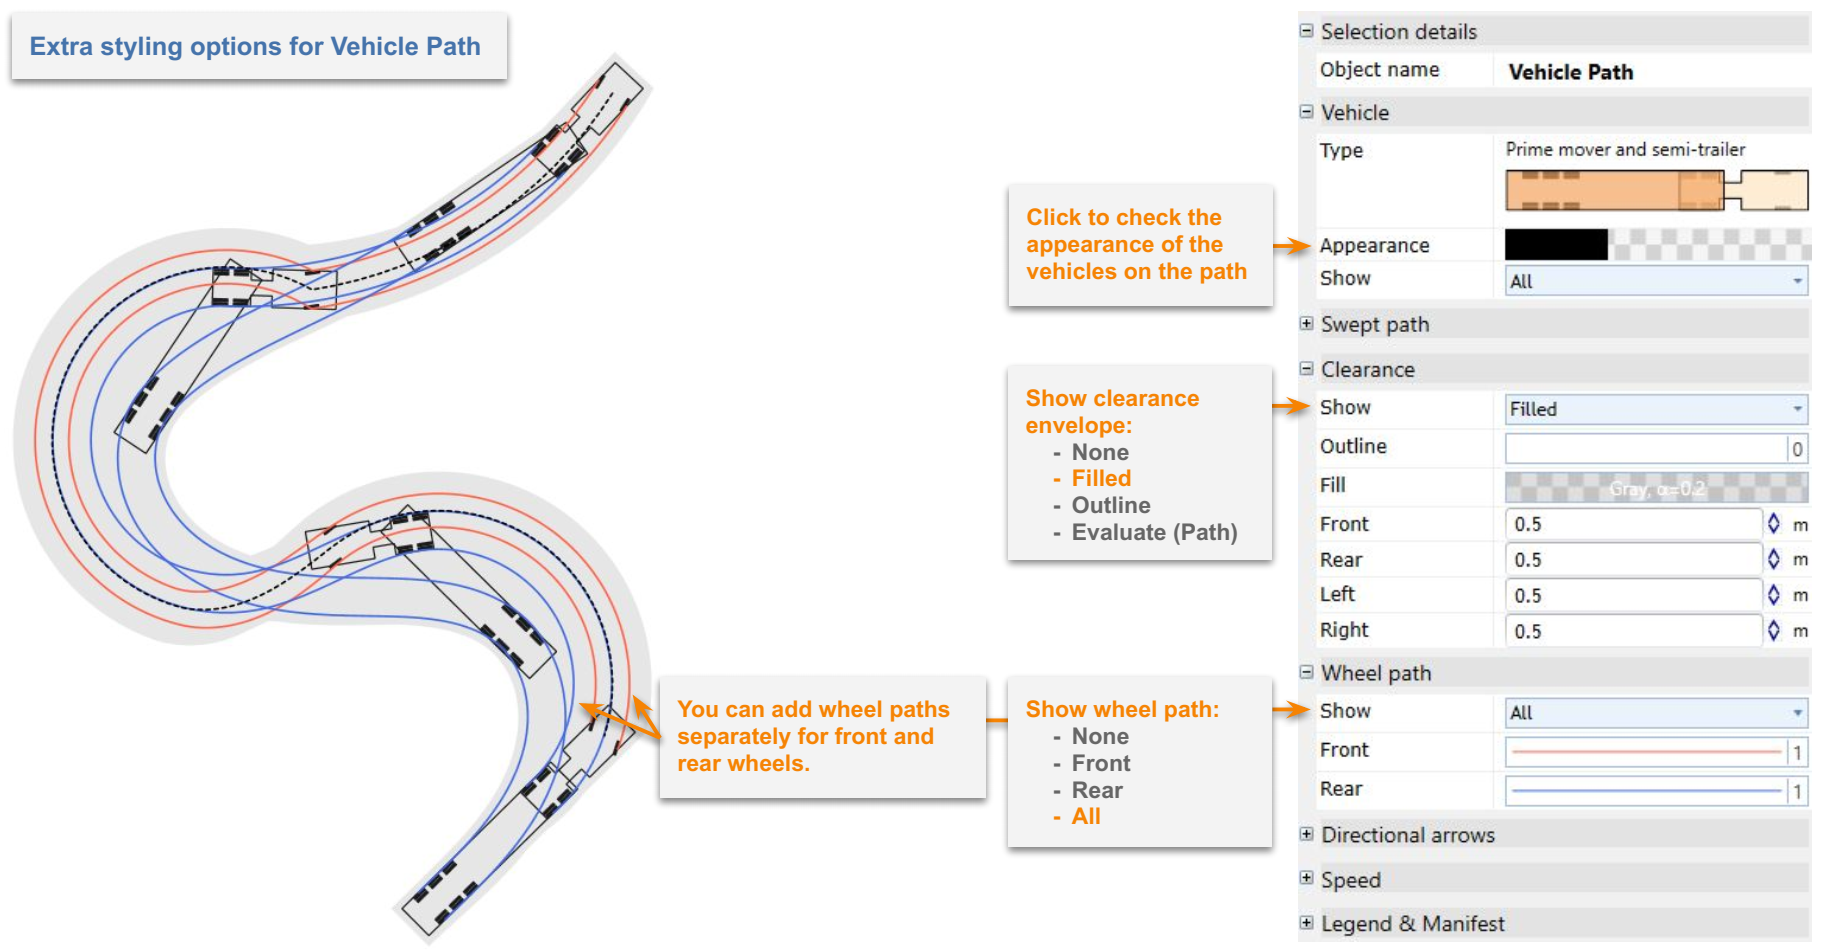
Appearance below this can be clicked for a drop down menu to appear, consisting of editable options to alter the outline and fill of the vehicle's parts, and opacity settings for each part of the vehicle.
A lower opacity value will make that part of the vehicle more opaque. Opacity of a part of the truck can also be applied by selecting the opaque option in the color selection menus.
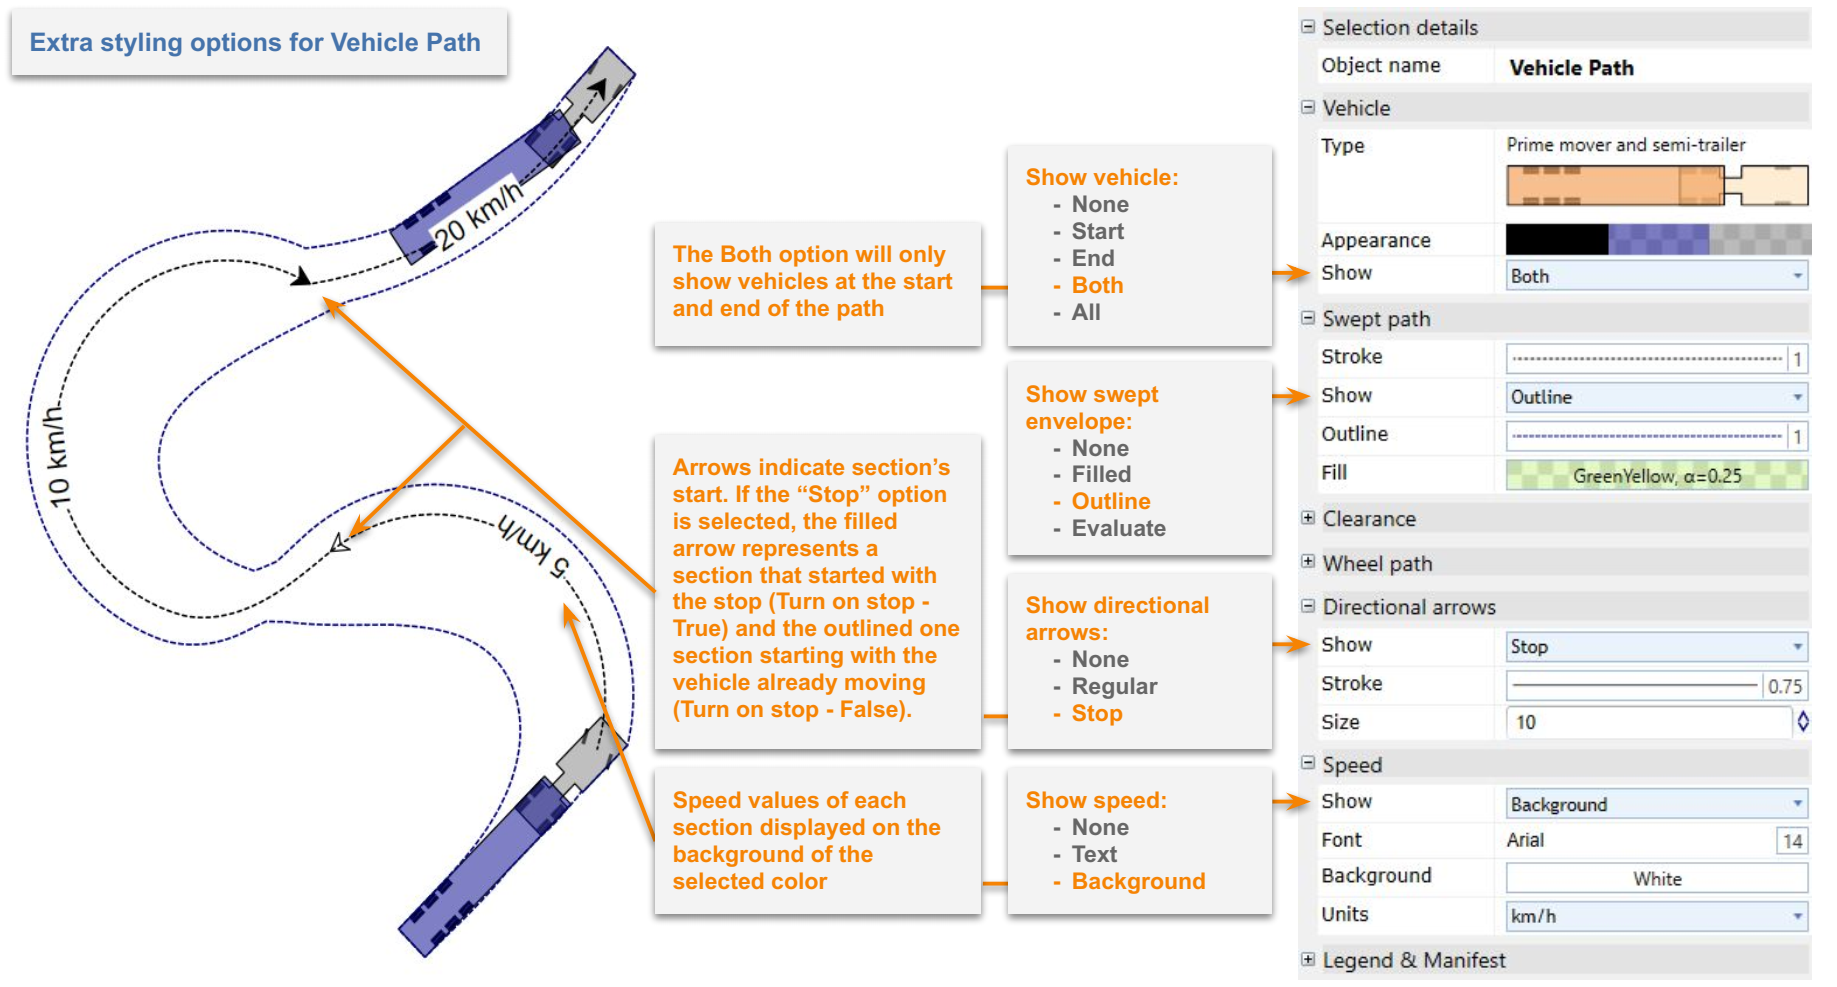
Show below dictates whether the vehicle is visible in the swept path, and if so - at which stages:
- None - The vehicle will not be shown in the path.
- Start - The vehicle is only visible at the start of the path.
- End - The vehicle is only visible at the end of the path.
- Both - The vehicle is visible at the start and end of the path.
- All - The vehicle is visible at every control point placed in the swept path.
Note that the initial vehicle placed on plan (from which the swept path was initiated) is a separate object to the swept path. If you would like this vehicle to not be visible in your plan, it will need to be removed by selecting and omitting it on the canvas.
Swept Path section
Alterations to the core elements of a swept path:
Stroke opens a drop down menu in which the appearance of a line that follows the path of the centre-point between the front axles of the vehicle through the swept path. Changes can be made to the line's width, color, style (e.g. dotted line or solid), and the shape of the ends of the line/dots.
Show will alter the appearance of the swept path, or whether it will appear at all:
- Filled - the outline and fill color of the path will appear.
- Outline - only the outline of the swept path is visible.
- None - the outline and fill of the path is not visible.
If none is selected, your swept path might, if the settings are selected, consist of an image of the vehicle at each point in the swept path, the stroke line, clearances which will be discussed next, wheel paths, directional arrows and/or the speed the vehicle is traveling at.
Predictably, Outline controls the appearance of the outline of the swept path, and Fill controls the appearance of its outline.
Clearance section
The initial envelope of the swept path displays the path of the vehicle if a driver navigates the space without error or any unexpected factors. To allow for variables, a clearance envelope around the original swept path envelope can be added.
As for other variables, the Show drop down menu can set the the clearance area to:
- Filled - Show the clearance fill and outline.
- Outline - Online show the clearance envelope's outline.
- None - Do not include the clearance envelope.
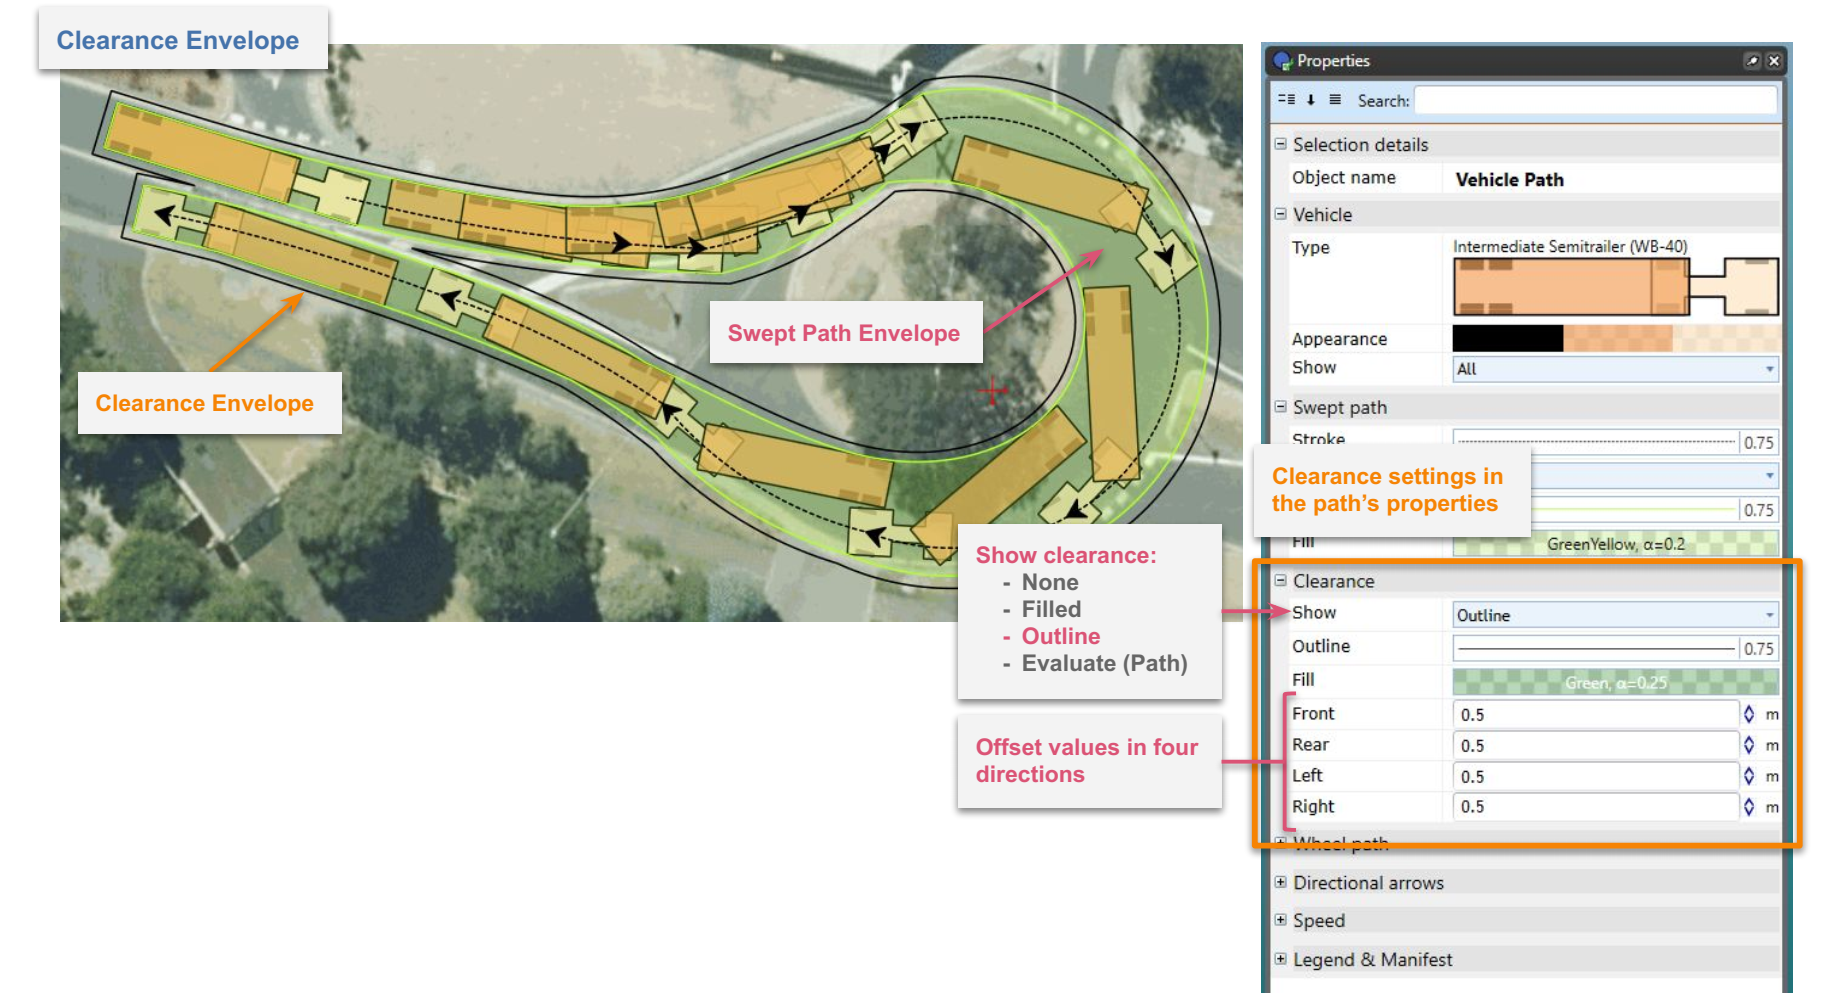
The outline and fill can be altered with dropdown options.
The amount of clearance allowed for can be altered in every direction, by altering the distance in the front, rear, left and right fields.
Wheel Path section
The path of a vehicle's wheels through a space can be a valuable element to display, particularly in spaces where curbs are being navigated - over which the outer body of the vehicle can hang without consequence.
Show can be set to:
- None - wheel paths are not shown.
- Front - front wheel paths are shown.
- Rear - rear wheel paths are shown.
- Both - both wheel paths are shown.
Below Show, alterations to the lines demonstration the front and rear wheels can be made.
Directional Arrows section
Directional arrows are a valid aesthetic choice if preferred, and can be valuable in a situation where a vehicle could possible be reversing, or in which the vehicle is performing both forward and reversing movement in the same path.
Show options:
- Regular - display the arrows in solid fill at every control point in the swept path.
- Stop - displays the arrows in solid color every time the vehicle stops, and an outline of the arrow at every control point where the vehicle doesn't stop (keeping in mind if turn on stop is engaged for a control point, this will make the arrow solid).
- None - arrows are not visible.
Stroke's sub-settings Width alters the width of the outline of the arrows, and color controls the color of the arrow.
Size alters the size of the arrows in a swept path.
Speed section
The speed of a vehicle can be altered in each segment of a swept path, doing so will alter its capacity to corner, and can be important contextual information for the reader of the plan.
Show can set speed information to:
- None - the speed of the vehicle isn't displayed.
- Text - the speed of the vehicle is displayed in text without a background.
- Background - the speed of the vehicle is displayed in text with a background.